Apple Rose Tart Recipe: A Beautiful Homemade Apple Tart with Apple Sauce 🍎🌹
There’s something lovely about turning a few simple apples into a dessert that looks almost too pretty to eat.
And this homemade apple rose tart is a perfect example.
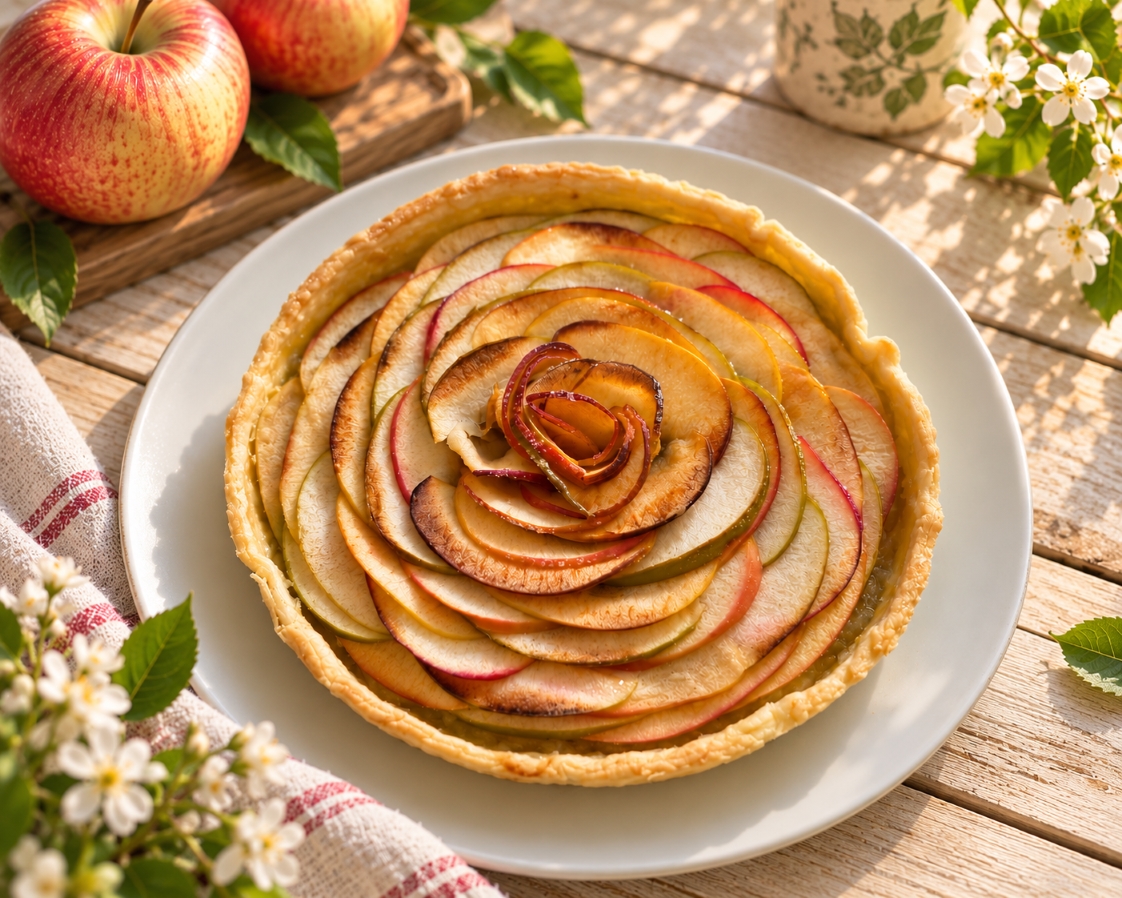
With its golden buttery crust, delicate layers of thinly sliced apples, and a soft homemade apple sauce filling, this tart brings together everything I love about home baking: simple ingredients, a little creativity, and the satisfaction of making something beautiful from scratch.
I particularly love the way the apple slices form a rose in the center. It looks rather impressive, but the secret is simply a little patience when arranging the fruit.
Well, perhaps more than a little patience. Those apple slices don’t always cooperate! 😅
But the result is worth it.
Today, I’m sharing this apple rose tart recipe, adapted from a recipe by Hanhey Home, with a homemade pastry crust and a delicious apple sauce filling.
Why I Love This Homemade Apple Tart
Apple desserts are among those comforting treats that never really go out of season.
But there’s something especially inviting about baking with apples during autumn, when markets are filled with different varieties.
What makes this homemade apple tart special is the combination of textures.
The pastry provides a buttery base, the apple sauce adds moisture and natural sweetness, and the fresh apple slices on top become tender and lightly golden in the oven.
I also like using different apple varieties rather than just one.
Some apples hold their shape beautifully during baking, while others soften more easily. Combining them creates a lovely balance of flavors and textures.
And, of course, arranging the slices into a rose makes an ordinary apple tart feel a little more special.
Ingredients for Homemade Apple Rose Tart
This recipe has three main components: the pastry crust, homemade apple sauce, and fresh apple topping.
1. Homemade Apple Sauce
Ingredients:
- 3 apples, peeled, cored, and diced
- 1 cinnamon stick
- 2 teaspoons sugar
- A pinch of salt
- 1 cup water or apple juice
- Juice of half a lemon
If you’re using sweet apple juice, you can leave out the additional sugar.
2. Homemade Tart Crust
Ingredients:
- 240 g all-purpose flour
- 227 g unsalted butter, softened
- 3 eggs, lightly beaten
- ½ teaspoon salt
This pastry recipe makes approximately two small tarts or one larger pie, depending on the size of your baking dish.
3. Apple Rose Topping
Ingredients:
- 3–4 fresh apples, depending on their size
- A little brown sugar
- Ground cinnamon
- Lemon juice
- Warm water
For a beautiful finish, choose apples with different skin colors. Red, green, and golden apples create a lovely natural pattern.
How to Make Homemade Apple Sauce
The first step is preparing the apple sauce.
This is what makes the tart particularly delicious because it adds a soft, fruity layer underneath the fresh apples.
Step 1: Peel, core, and cut the apples into small pieces.
Step 2: Place the apples in a saucepan with the cinnamon stick, sugar, salt, and water.
Step 3: Cook over medium-low heat until the mixture begins to simmer gently.
Step 4: Add the lemon juice and continue cooking until the apples become soft and slightly translucent.
Step 5: Turn off the heat and let the mixture rest for approximately 15 minutes.
Step 6: Remove the cinnamon stick and mash the apples with a fork until you have a thick, slightly chunky sauce.
Allow the apple sauce to cool before using it in the tart.
I love that this homemade apple sauce for tart can also be prepared in advance, making the baking process much easier.
How to Make the Homemade Tart Crust
A good tart begins with a delicious pastry base.
This recipe uses a simple buttery dough that can also be adapted for other sweet or savory tarts.
Step 1: Combine the flour, salt, and softened butter in a mixing bowl.
Step 2: Mix until the ingredients form a crumbly texture.
Step 3: Gradually add the beaten eggs and mix until a dough forms.
Step 4: Knead gently until the dough becomes smooth. If it feels too dry, add a little water. If it’s too sticky, sprinkle in a little extra flour.
Step 5: Roll the dough into a thin sheet, fold it in half, and roll it out again. Repeat a few times.
Step 6: Refrigerate the dough for approximately 30 minutes to make it easier to handle.
Step 7: Roll out the chilled dough and carefully press it into your tart pan.
Trim away any excess pastry around the edges.
Your tart crust is now ready for the filling.
How to Make Apple Roses for Tart Decoration
This is my favorite part of the recipe!
The secret to creating a beautiful apple tart with rose decoration is cutting the apples into very thin slices.
You want them flexible enough to bend without breaking.
Step 1: Wash the apples and remove their cores.
Step 2: Slice the apples as thinly and evenly as possible, keeping the colorful skin.
Step 3: Place the slices briefly in warm water mixed with lemon juice.
This helps prevent browning and makes the slices easier to shape.
Step 4: To create the rose in the center, overlap several apple slices in a row and gently roll them together.
Step 5: Arrange the remaining slices around the center, slightly overlapping each piece to create larger petals.
Don’t worry if your rose isn’t perfectly symmetrical.
Nature rarely makes perfect roses either, and that’s part of their charm.
How to Assemble and Bake the Apple Rose Tart
Once your pastry, apple sauce, and fresh apple slices are ready, it’s time to bring everything together.
Step 1: Prepare the crust
Preheat your oven to 230°C (450°F).
Place the pastry dough into your tart pan and gently press it against the bottom and sides.
Step 2: Add the apple sauce
Spread a generous, even layer of homemade apple sauce across the bottom of the pastry.
Avoid adding too much liquid, as this could make the crust soggy.
Step 3: Arrange the apple slices
Starting from the outside edge, arrange the thin apple slices in overlapping circles.
Continue working toward the center until you create a rose-like pattern.
Place your rolled apple rose in the middle.
Step 4: Add the finishing touches
Sprinkle a little brown sugar and cinnamon over the apples.
Step 5: Bake the tart
Cover the tart loosely with aluminum foil.
Bake at:
- 230°C (450°F) for 10 minutes
- Reduce to 190°C (380°F) for approximately 30 minutes
Remove the foil during the final five minutes to allow the apples to become golden.
If necessary, leave the tart in the switched-off oven for another 10–15 minutes, checking frequently to prevent overbrowning.
The tart is ready when the pastry is cooked through and the apples are tender and lightly caramelized.
Baking times may vary depending on your oven and tart pan.
Ingredients
Method
- The first step is preparing the apple sauce. This is what makes the tart particularly delicious because it adds a soft, fruity layer underneath the fresh apples.
- Step 1: Peel, core, and cut the apples into small pieces.
- Step 2: Place the apples in a saucepan with the cinnamon stick, sugar, salt, and water.
- Step 3: Cook over medium-low heat until the mixture begins to simmer gently.
- Step 4: Add the lemon juice and continue cooking until the apples become soft and slightly translucent.
- Step 5: Turn off the heat and let the mixture rest for approximately 15 minutes.
- Step 6: Remove the cinnamon stick and mash the apples with a fork until you have a thick, slightly chunky sauce.Allow the apple sauce to cool before using it in the tart.I love that this homemade apple sauce for tart can also be prepared in advance, making the baking process much easier.
- A good tart begins with a delicious pastry base. This recipe uses a simple buttery dough that can also be adapted for other sweet or savory tarts.
- Step 1: Combine the flour, salt, and softened butter in a mixing bowl.
- Step 2: Mix until the ingredients form a crumbly texture.
- Step 3: Gradually add the beaten eggs and mix until a dough forms.
- Step 4: Knead gently until the dough becomes smooth. If it feels too dry, add a little water. If it’s too sticky, sprinkle in a little extra flour.
- Step 5: Roll the dough into a thin sheet, fold it in half, and roll it out again. Repeat a few times.
- Step 6: Refrigerate the dough for approximately 30 minutes to make it easier to handle.
- Step 7: Roll out the chilled dough and carefully press it into your tart pan.Trim away any excess pastry around the edges.Your tart crust is now ready for the filling.
- This is my favorite part of the recipe! The secret to creating a beautiful apple tart with rose decoration is cutting the apples into very thin slices.You want them flexible enough to bend without breaking.
- Step 1: Wash the apples and remove their cores.
- Step 2: Slice the apples as thinly and evenly as possible, keeping the colorful skin.
- Step 3: Place the slices briefly in warm water mixed with lemon juice.This helps prevent browning and makes the slices easier to shape.
- Step 4: To create the rose in the center, overlap several apple slices in a row and gently roll them together.
- Step 5: Arrange the remaining slices around the center, slightly overlapping each piece to create larger petals.Don't worry if your rose isn't perfectly symmetrical. Nature rarely makes perfect roses either, and that's part of their charm.
- Once your pastry, apple sauce, and fresh apple slices are ready, it’s time to bring everything together.
- Step 1: Prepare the crustPreheat your oven to 230°C (450°F).Place the pastry dough into your tart pan and gently press it against the bottom and sides.
- Step 2: Add the apple sauceSpread a generous, even layer of homemade apple sauce across the bottom of the pastry.Avoid adding too much liquid, as this could make the crust soggy.
- Step 3: Arrange the apple slicesStarting from the outside edge, arrange the thin apple slices in overlapping circles.Continue working toward the center until you create a rose-like pattern.Place your rolled apple rose in the middle.
- Step 4: Add the finishing touchesSprinkle a little brown sugar and cinnamon over the apples.
- Step 5: Bake the tartCover the tart loosely with aluminum foil.Bake at: 230°C (450°F) for 10 minutesReduce to 190°C (380°F) for approximately 30 minutesRemove the foil during the final five minutes to allow the apples to become golden. If necessary, leave the tart in the switched-off oven for another 10–15 minutes, checking frequently to prevent overbrowning. The tart is ready when the pastry is cooked through and the apples are tender and lightly caramelized. Baking times may vary depending on your oven and tart pan.
Tips for Making the Best Apple Rose Tart
Choose Different Apple Varieties
Using several varieties creates a more interesting balance of sweetness, acidity, and texture.
For example, Granny Smith apples provide a pleasant tartness, while sweeter varieties such as Gala or Fuji can balance the flavor.
If you’re curious about choosing the best apples for baking, there are some excellent professional baking guides available.
Slice the Apples Thinly
Thin slices are essential for creating the rose shape.
Thicker slices are more difficult to bend and may not cook evenly.
Don’t Overfill the Tart
A thick layer of apple sauce may release too much moisture during baking.
Spread just enough to cover the pastry evenly.
Allow the Tart to Cool
Letting the tart cool helps the filling settle and makes slicing easier.
Personally, I think this tart is lovely served chilled, although it’s equally delicious warm.
How to Serve Homemade Apple Tart
There are two delicious ways to enjoy this dessert.
Served chilled: Refrigerate the tart after it has cooled completely. The apple sauce becomes slightly firmer, and the flavors have time to develop.
Served warm: Add a scoop of vanilla ice cream and let it slowly melt over the warm apples.
A cup of coffee or tea is all you need to complete the experience.
And if you’re serving this tart to guests, don’t be surprised if everyone reaches for their phone before reaching for a fork.
A little apple rose deserves its moment in the spotlight! 🌹
A Little Joy in Homemade Baking
One of the things I enjoy most about baking is how ordinary ingredients can become something unexpectedly beautiful.
A few apples, some butter, flour, and eggs might not sound particularly exciting.
But give them a little time, and they can become a lovely homemade dessert.
Of course, not every apple slice will fall perfectly into place, and not every tart will look like something from a French pâtisserie.
That’s perfectly fine.
For me, homemade baking isn’t about perfection.
It’s about enjoying the process, trying something new, and sharing something delicious with the people around us.
And if the final result happens to look like a rose?
Well, that’s just a lovely bonus.
Happy baking! 🍎
Recipe adapted from Hanhey Home. The original recipe inspired this homemade apple rose tart, including its buttery pastry crust and apple sauce filling.